Sunday, January 30, 2022

Salmon Fish Head Curry


One dish meal.......curry again....Salmon Fish Head Curry, added a fillet piece for the Meat Eater. He walked into the kitchen and asked why the curry  smells so good today. I pointed to  the Screwpine leaves knotted together simmering in the hot spicy coconut milk. That's the reason why it is so fragrant.  He is one happy man now that I am back as a full time home Chef. Tonight's dinner is just this Fish Head Curry and I know I have to cook extra rice . Curries are appetising dishes no matter how you cook them. Dry curries are also delicious but I have yet to master it. So for now, it is just wet curries for now.

the addition of Screwpine leaves to the curry enhanced the flavour and aroma

I added a fillet piece for the husband
the salmon head and fillet piece were fresh

Ingredients
Half a Salmon Fish Head
1 salmon fillet

2 cloves garlic - sliced thinly
5 shallots - sliced thinly
4 tbsp of curry powder
2 tbsp of Khasmir Red Chilli powder *optional, I added for extra heat and color
1 large egg plant- cut into cubes
6 okras
2  large tomato- cut into wedges
3 Screwpine leaves - tie into a knot
2 sprigs curry leaves
4 tbsp oil
100 ml coconut milk
750 ml water

Method:
1. Mix curry powder and Khasmir red chilli powder with some water till it come a paste.
2 Heat up oil in pot and saute the sliced garlic, shallots and curry leaves and curry paste till fragrant.
3. Add in the cut  egg plant, okras and tomato till they softened. Add in water and Screwpine leaves and allow to simmer over low heat till the veggies has softened and cook through. Add in coconut milk and the fish head and fillet . Cook over low heat till fish head and fillet are cooked through. Add salt or seasoning to taste. 
4. Off heat and serve with hot rice.

Enjoy!


Friday, January 28, 2022

Katsu Curry


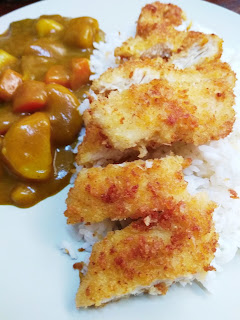
I really don't know what to cook for dinner. Search into the cupboard, found a box of Japanese Curry Mix, bought sometime back from MIDORI . And since I have chicken breast. I decided to just cook out of box  Katsu Curry/Japanese curry for dinner. Katsu Curry with Chicken Cutlet....the rich thick curry sauce with the rice is so yummy good  ! Crispy Pan fried Chicken cutlet as a side completes the whole meal. Meat Eater is happy, I am happy too. He loves it when I come back full time Chef in the kitchen 
.
I used S&B for the Japanese Curry Mix
Seriously good, tasty and medium hot
just perfect for the husband
I cooked the curry with vegetable only as I have the crispy chicken cutlet to go with the curry and rice
One box can serve 12 servings, so I cooked half box for 6 servings but between the two of us, we can two meals from one satchet of curry roux.

Recipe link for Katsu Curry

Wednesday, January 26, 2022

Bak Kwa For CNY 2022

Its time to make these finger licking good Chinese Meat Jerky/ Bak Kwa in Hokkien and 'Long Yok' in Cantonese. I make them almost every CNY for the husband. This year I am thankful I could make them for him to enjoy, once a year affair. Lol, so pitiful . It is not hard to make but considering I had a recent hamstring injury and just recovered, I tried not to overdo and thus make a small load for him. Oven grilled is much easier than grill them over charcoal fire. Of course the later , is authentic and smell good. But just the same oven grilled taste good too. And making them yourself is more economical and we can control the sweetness too. I used the recipe which I took from Sonia in 2017. Recipe link is at the bottom of this page.
 

so happy that they turned out great

Pizza cutter is best tool to use for cutting them after the first 25 mins of grilling
Preferably to marinade them overnight in fridge for richer flavour

Recipe link


Tuesday, January 25, 2022

Crispy Tofu


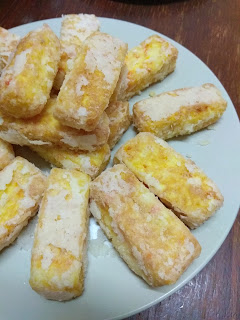
This is a very delicious tofu dish. Using Japanese egg tofu with fish paste, egg, green onions, ham, carrots, water chestnuts and some seasoning salt ,white pepper. Mix them together and steam. Once cool, cut , coat with potato starch and deep fried. You will get the most delicious crispy tofu just like how they serve in restaurants. You can serve this crispy tofu for the coming CNY. I am sure the old and young will love this flavourful and crispy tofu. Give it a try and you will add it to your family dinner menu. I make this very often since 2013, the year I learned to make this dish.
Using potato starch as coating gives the tofu the lasting crisp until the last piece

Dust off extra potato starch before deep frying
Cut into desired sizes, either square or rectangular shape
Cool the tray of Steamed tofu before cutting into desired sizes

Crispy Mashed Tofu - adapted from Wendy 

3 pieces Japanese egg tofu
125 gm fish paste
1 large egg
2 rbsp carrot shreds
2 tbsp finely sliced spring onions and parsley ( can use coriander )
2 waterchestnuts, finely diced
1 slice sandwich ham (30 gm) finely diced
1 tbsp cornstarch
1/2 tsp salt and pepper to taste.

Coating
1/2 cup potato starch

1. Mix everything together with a mixer ( or by a hand, but I was laseeee)
2. Line a 7 inch squarre pan with heat safe plastic wrap
3. Pour mixture into lined pan.
4. Steam on medium heat for 8-10 minutes 
5 .Let the steamed tofu cool down in the pan.
6. When tofu has totally cooled, lift tofu up from pan and remove from plastic wrap.
7. Cut into cubes or diagonal pieces, whichever way you like.
8. Heat a wok with sufficient oil for frying.
9. Coat tofu pieces with potato starch and deep fry until golden.
10. Drain tofu pieces well and serve with chilli sauce.

Monday, January 24, 2022

Homemade Wanton Skin

Since the pandemic started in 2019, I have learned to stay home and make dishes from stratch. First I learned how to make pasta with pasta maker. Later down the road, I bought a pasta maker since I love fresh pasta more than the dry ones and there is no stopping me from making fresh noodles and pasta with the pasta maker. And today I used the same pasta maker to roll out the wanton skin to the right even thickness. Makes it so much easier than using a rolling pin to roll out to even thickness. I guess practice makes perfect if using a rolling pin. But since I have a pasta maker, and following the step by step from YouTube, making these wanton skin will not be a problem. I am glad they turned out looking legit 😀 I will post up the link to this wanton skin tutorial from you tube at the bottom page of this post.
 love this homemade version of wanton skin

 shrimps and pork mince fillings


Link for the step by step tutorial for making this wanton skin from scratch


Dough ingredients
1.5 cups AP Flour
1/2 cup water
1/2 tsp sodium bicarbonate/ baking soda
1/2 tsp salt


Thursday, January 20, 2022

Roast Pork Rack

Taught by my son @pharmaskitchen ( Instagram account) on how to prepare the rack for roasting. I prepared my own BBQ sauce by mixing smoked bbq seasoning powder, oyster sauce, tomato sauce, chilli sauce ,olive oil, brandy and roasted garlic herbs and not to forget the Korean Corn Syrup. Stir them till well combined. 

After 2 hrs on slow roasting @130c, open up the alumium foil and brush on the homemade BBQ sauce. Further roast the rack for another 15 mins at 230C. The aroma is fantastic. Thanks SL for sharing your signature dish .

Fingers-licking good Pork Rack

Monday, January 17, 2022

Pulut Tai Tai / Blue Glutinous Rice Cake

It is my first time making this Nyonya Kuih. Pulut Tai Tai or Blue Glutinous Rice Cake with Kaya Jam . I made a small portion just for hubby and myself. I thought it was tedious to make but it was quite easy to make actually. I was not able to make the Kaya Jam myself as I had a leg injury, so we bought those ready made ones from the store. So that being said, making Pulut Tai Tai is made easy and not tedious. I just need to steam the glutinous rice and dye the rice with the natural blue colour from the blue pea flowers. This recipe is a keeper and I will definitely make this again. Recipe link is at the bottom of page.
 
the glutinous rice is firm and have a 
slight chewiness

I am so thankful that I have a banana plant in the garden
I  cover the the top with Banana leaf
before placing weight on it
the cute weights sitting on the glutinous rice are my favourite clay figurines of koalas and piggy


Friday, January 14, 2022

Peanut Cookies

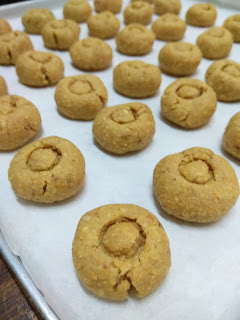
Peanut Cookies are my husband's favourite cookies and I will only make them for him once a year. And that is Chinese New Year time. It is quite tedious but once the peanuts are fried and have their skin removed, the rest is plain sailing. This year is a bit special...I had hamstring injury so the hubby agreed to help get the nuts ready. I just need to mix the blitzed peanuts and other ingredients into a dough. Then shaped the dough into small round balls. I learned how to make ' nipple look' imprint on each ball. By using a thread reel. I learned this method from Sonia of Nasilemaklover. The best imprint thus far. The peanut cookies turned out great , fluffy and has tiny bits of peanut as you bite into each cookie. Hubby is happy with the cookies. He can hug the jar of cookies to sleep :)  This is a lard free peanut cookies. 

beautiful imprint 

by using a thread reel to get a nice  imprint
the dough should not be overly wet
nor dry
small sized peanuts are best for making peanut cookies, as they are more fragrant

Peanut Cookies - makes 150 pieces

600 gm ground peanuts - fried, skin removed and blitzed till fine but not into powder form
455gm Plain flour
220gm icing sugar
150gm vegetable oil
2 tbsp unsalted butter - melted
1tsp salt
Method:
Mix all the dry ingredients together till well combine. Add in butter, then slowly add in the vegetable oil. Do not pour in the oil all at one shot.  Use a spatula to mix the ground peanuts and flour mixture and oil together till you get a dough not too wet nor too dry. If you can form a small ball without breaking, it is good texture.  Cover with cling wrap and rest dough for 15 mins. 
Shape dough into small round balls and placed the balls on greased proof paper lined shallow baking tray. Repeat till the peanut dough is used up. Use a thread reel to make imprint on the top of the peanut ball. Brush top and side of each ball with egg wash.
Bake at 180C for 15 to 17 mins, depending on your oven. Mine takes 15 mins to bake till golden brown. Cool and store in air tight container.

Enjoy!


Drunken Chicken In Red Rice Wine


A friend gifted us two bottles of red rice wine which she homemade herself. I have used the red rice wine for noodles soup. For this instant I cooked Drunken Chicken Soup with it for dinner. Added in wood ear fungus. Just this soup dish alone is enough to warrant a second helping of rice. It's important to fry the ginger strips till crispy and aromatic with sesame seed oil. Then add in the chicken meat and continue stir fry till chicken is half cooked. Add in water or chicken broth and the red rice wine together with the wood ear fungus and continue to simmer till the chicken meat are fully cooked. Add in salt to taste last. Off heat and served with rice.

Ingredients;-

2 chicken legs - cut into 4 portions

Thumb sized ginger - cut into thin strips

1tbsp sesame oil

5 pieces of dried wood ear fungus- soak and wash clean.

1 cup of red yeast glutinous rice wine

3 cups chicken broth or water

Salt to taste.

Enjoy!

Wednesday, January 12, 2022

Garlic Chilli Condiment

Made a jar of garlic chilli condiment to go with dry tossed noodles and dumplings. It has been a while since I last made this aromatic condiment. Made up of just four ingredients. During this pandemic, most of our daily breakfast , lunch and dinner are homecooked. We stay home most of the time unless to do grocery and very rare occasions have takeout. So this homecooked  garlic chilli dip is one of the best condiment to go with homecooked noodles and dumplings and roast meat. For those of you who wants to try making this delicious garlic chilli dip, I have shared the recipe below so that you can enjoy it too :)

Two important tips to know.

1. Add in garlic and chilli paste to oil and give the ingredients a good mix them together before you start cooking.

2. Cook under very low heat and keep stirring the garlic chilli oil mixture in pot/ wok until oil surfaced. Too high heat will burnt the garlic and the garlic chilli dip will taste bitterish.

Garlic Chilli Dip

35 dried chilli - soaked remove seeds

3 chilli padi for extra heat * optional

2 Big heads of garlic - peeled

1 cup + of cooking oil

1 heaped tsp salt

Method:

Blitz chilli and garlic till smooth paste.

Cook paste with 1 cup of oil under low heat till oil surfaced. Keep stirring while cooking so that the chilli paste doesn't get burnt.Add salt last. Off heat and cool down before storing in glass jar. Keep refrigerated.

Enjoy!


Monday, January 10, 2022

Fresh Spinach Noodles Recipe

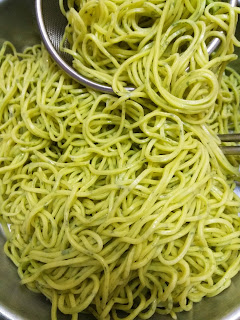
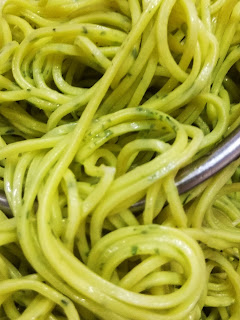
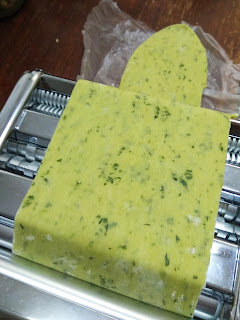
Fresh Spinach Noodles making...my Saturday stay home project 😅. 1st fresh noodle making for 2022 😁 I am happy I get to crank up the pasta maker again. I had make fresh noodles many times in 2021 but for this time I added blended spinach to the dough. Thank God it turned out great. I used the egg noodle recipe. I had to tweak the recipe a bit  because the spinach has water content, meaning I have to reduced the egg to accommodate the liquid from the blended spinach. The texture maintained the same as the egg noodles. A well balanced of nutrients in the noodles...iron from the spinach and protein from the eggs :)
beautiful strands of cooked noodles

crank crank crank I love doing it
I like what I am looking at
the speckled look on the rolled out
dough sheet

Fresh Spinach Noodle Recipe
Ingredients
300 gm AP Flour
2 eggs - removed a tbsp of white
1tbsp vegetable oil
1/4 cup or less juice of blended blanched spinach
1/2 tsp salt
( Total weight of eggs,oil, spinach juice shoul be 145gm )
2 tbsp of the pulp of spinach to be added to the dough for a speckled look on the noodles.

Combine all the ingredients together and knead till the dough becomes a rough textured ball. Do not worry if the dough looks dry. 
Wrap dough in a plastic bag and leave to rest for 30 mins. After which ,the dough will be more malleable.
Take out the dough and knead it lightly. Place dough between two plastic sheet and roll into a rectangular shape  and fold the dough like folding a letter. 
(A) Do the roll out and fold two times. 
Place dough back into plastic bag and leave the dough to rest for an hour. 
Repeat step (A) and rest dough for another one hour .
Divide dough into 3 portions
If using pasta maker. Roll out dough from #0 to #5, then cut into strands
Dust dough with potato starch before cutting , to prevent sticking.
Repeat until all dough are used up.

Heat up a pot of water. When water boils ,put in the noodles. Cook for 3mins. Take out noodles and add oil so that the noodles doesn't stick together. 
Enjoy!


Thursday, January 6, 2022

2022 - Yam Cake Remake


2022 looks promising in Elin's Kitchen. Good stuff coming out from it 😂 My first Yam Cake in 2022. My hubby says " keep them coming " 🤣 His favourite kuih is Yam Cake😁
Recipe link is at the end of page.
I pray that I can continue to cook and bake till my last breath. 
May God continues to bless everyone on earth with good health and keep everyone safe from Covid and flood. Amen!

Recipe Link for the Yam Cake

Wednesday, January 5, 2022

Salted Egg Yolk Chicken

I have added this dish to our dinner menu list. Salted Egg Chicken is a delicious fried chicken nugget dish that is stir fried with salted egg yolk , curry leaves, chilli and garlic. The chicken nuggets remain crispy on the outside and every bites full of the flavourful salted egg yolk.  Recipe link is shared at the bottom of page. 
I tweaked the recipe by using the salted duck egg white instead of using whole egg and coated the nugget sized chicken pieces with potato starch.  And deep fried in hot oil till lightly browned.
these are the ingredients used for making this delicious salted egg yolk chicken

Recipe link


Monday, January 3, 2022

Spaghetti Aglio Olio With Treasures From The Sea


New Year Dinner...we had Spaghetti Aglio Olio topped with treasures from the sea. We just wanna finish all the seafood in the freezer. So glad we managed to pull up this dish for our first dinner 2022 😂 I always have a reason for having these artery clogging goodness...simply coz it's still New Year. We can starve on seafood for the rest of the year okay. Actually these seafood were bought in November 2021 for Christmas but we didn't get to eat them all 😅

Hubby helped to pan fried all the seafood on the Lodge cast iron pan. Once they are cooked, he dished them up and start saute the freshly chopped garlic, chilli till fragrant. After which he added in the cooked spaghetti and mixed them well in the cast iron pan. He added in the store bought Aglio Olio seasoning powder and gives the pasta a quick stir and some of the pasta water. Add salt to taste and topped the cooked seafood onto the spaghetti before serving. What a wonderful pasta dish for our first New Year dinner.


Enjoy!

Saturday, January 1, 2022

Homemade Pizza With Beef Salami


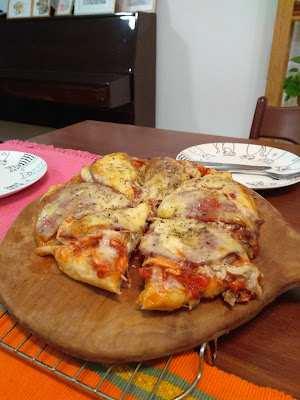
Our first meal of 2022.....my signature pizza 😂 My hubby loves pizza and all these years married to him, I learned to make them and the toppings are mostly his favourites...Beef Salami and plenty of Mozzarella but me, the home Chef ,will control his intake of cheese 😁. I added leftovers of roast chicken. The tomato sauce , I used the canned one with peeled tomato, so  I save buying fresh tomatoes. I added mixed herbs to the tomato sauce and thickens it. I also grated the Mozzarella and cheddar cheese and stored them in IKEA  Ziploc bags and throw the balance into the freezer for future use. It was worth the efforts making the pizza from scratch. It turned out yummilicious. A generous sprinkles of dried oregano on the top while it is still hot, adds flavour to the pizza. 

The crust dough recipe is shared below.


Dough Recipe for the crust base

1.5 cups AP Flour
1cup High Protein Flour
4gm instant yeast
1tsp salt
1tsp sugar
2tbsp olive oil
1cup warm water

Mix all the ingredients together and knead till smooth (abt 6 mins) Leave to rest for 30 mins. Divide dough into 2 portions. One portion of dough can fit a 8 inch dia. round pizza tray.
Toppings of your choice.

Enjoy!


Related Posts Plugin for WordPress, Blogger...