Monday, March 31, 2014

Steamed Grouper Fillets With Compressed Fresh Beancurd Skin/Tao Pau


Compressed Beancurd Skin is good for health and I love the thick texture as you bite into it.  Not hard nor too soft..best for steaming together with fish fillets .  The natural sweetness from the fish will drips onto the compressed beancurd skin and you can imagine how tasty and fragrant the beancurd skin is :p  For Ipohans you can get these compressed beancurd skin from a truck outside Kg Simee market that sells all kinds of tofu.  Click here to see my pan fried Compressed Beancured Skin.

This is one delicious and comfort dish for me.  For WB, as long as it is fish fillets , he will eat. He is scared of fish bones and filleted ones are easier to eat for him LOL!  I placed the marinated fish fillets on top of the compressed beancurd skin nd steamed for just  6- 7 mins in boiling steamer. 3 mins before I off the heat , I poured a soy sauce dressing with fried garlic oil on top of the fish fillet.  Wow, this dish is a winner all right :)


 compressed beancurd skin


marinate the fish fillets with chinese cooking wine and ginger juice
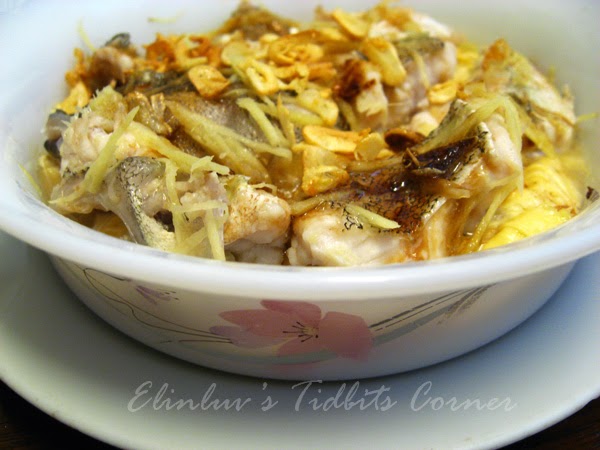

a winner  !!!!!
this is one delicious meal that I don't see
restaurant serving it...LOL!


Steamed Grouper With Compressed Fresh Beancurd Skin/Tao Pau

ingredients:

500 gm of grouper fillets - or any fish of your choice
1 tbsp of ginger juice
some ginger shreds
1 tbsp of chinese cooking wine
1 square piece of compressed beancurd skin/ tao pau - cut into pieces

soy sauce dressing:

2 cloves of garlic - sliced thinly
2 tbsp of soy sauce
1 tbsp of oil

Prepare the soy sauce dressing

Heat oil in wok, add in the garlic slices and fry till the garlic turned light golden color. Pour in 2 tbsp of soy sauce and let it sizzle for a second. Off heat and dish up.

Method:

Heat up a steamer.
Marinate the fish fillet with ginger juice, shreds of ginger and chinese cooking wine. Let it marinate for 10-15 mins. Arrange the pieces of compressed  beancurd skin at the base of a shallow dish that can take heat. Place the marinated fish fillets over the beancurd skin .  Steam the fish for 6-7 mins.  3mins before taking it out of the steamer. Pour soy sauce dressing on top and close back the lid. When the 7 mins is up. Off the heat and serve hot with rice.


Enjoy!


*              *               *


Thursday, March 27, 2014

Mango Salad


This is my favorite appetizer .  Mango salad is so refreshing and easy to whip up too.  It is a great accompaniment for meat dishes.  The dressing is the main attraction here. Tangy flavor from fresh lime juice, salty flavor from the fish sauce and spicy flavor from chillies and the sweet flavor from the brown sugar. A perfect combination and the garnishing of crunchy dried shrimps and peanuts add texture to the salad.  It is 'wow' appetizer and I make this very often.  I used apple mango for this mango salad.  They are cheap when in season :) Provides natural vitamin C too :)   This is so good that I recommend you try this too :)


Mango Salad

Ingredients :

300 gm unripe mango
2 shallots- thinly sliced
2 bird eye’s chillies ( red ,green- one of each )
2.5 tbsp of fish sauce
2 tbsp lime juice
20 gm dried shrimps – soak, drained and deep fried till crispy
40 gm peanuts- toasted and pound coarsely
3 tbsp brown sugar

Method:

1.  Peel the green mango and shred with a zig zag peeler  or  julienne  manually.
2.  Soak the mango shreds in ice cold water to make it crunchy texture.
3.. Mix fish sauce, lime juice and brown sugar in a small bowl
4.  In  a big bowl, mix  all the ingredients together  ,except the peanuts and  deep fried dried shrimps , till well combined.  
5.  Garnish with peanuts and dried shrimps.  
6.  Served chilled or at room temperature.


Enjoy !


*                *                *


Wednesday, March 26, 2014

Simple Linguine With Fresh Grey Oyster Mushroom


Yesterday dinner was linguine with oyster mushroom and pan fried threadfins  :) Lazy people like me just love this kind of cooking that doesn't involve much washing.  I love the mushrooms..it was sauteed with garlic and olive oil and flavored with sea salt herb ( I bought a bottle of sea salt with herbs from BIG when I was in KL ) and the cooked linguine was put into the pan with the sauteed mushroom and stirred together till well combined.  To make our meal more complete, I pan fried some threadfins ( Ikan Senangin ) , cut some cherry tomatoes and tada, WB and myself had one great pasta dinner.  One healthy and fulfilling dinner :)


love the fresh mushrooms....nom nom nom


the threadfins were fresh and sweet
and the water convolvulus ( kangkung )
were from my garden  :)  I planted some for emergency
like this...when I find any vegetables in the fridge  LOL!


Enjoy !


*                 *                *


Monday, March 24, 2014

Chicken Burger


Homemade burgers are better than store bought. At least you know what is inside your burger.  I made some chicken burgers for WB.   Made a dozen and stored them in air tight container in the freezer. Whenever he is hungry, he can just take out one and pan fried it himself and make a sandwich with the oh so delicious homemade burger :)   They are easy to make and you can add any flavors you like.   I  like to add fresh italian parsley , ground black pepper , onions and chilli flakes to the chicken burger.  Breadcrumbs is a must...it helps bind the mixture together and at the same time retains moisture in the mix.  I used chicken tenders to make these delectable and moist burgers.  I am not much of a meat eater but  WB  is , and he loves homemade ones. 

I packed them in air tight containers , place plastic in between each piece
so that the burgers doesn't stick together when frozen 


I minced the chicken tender coarsely so that WB can feel 
the texture of the chicken as he bites into the burger


pan fried the burger with a tsp of butter on a non-stick pan
and brush on bbq sauce when the burger is cooked and
ready to dish up. Serve with homemade bread ...yummy!


Chicken Burger - WB's Kitchen

Ingredients

500 gms of chicken tenders - minced coarsely
1 tbsp of olive oil
1 tsp of freshly ground black pepper
1 red onion - diced 
sea salt to taste
chilli flakes to taste
1 few sprigs of italian parsley - chopped coarsely
1/2 cup of breadcrumbs

a tsp of butter for pan frying or vegetable oil for a healthier version

Method:

Mix all the ingredients together in a mixing bowl.  Stir the mixture till well combined and sticky.  Shape them burger size of your choice.  Store them in air tight container in freezer with a piece of plastic in between each piece of burger.  When the burger is chilled and slightly harden , you can pan fried them with either butter or vegetable oil.  Brush on smoked bbq sauce for better flavor . 


Enjoy ! 


Thursday, March 20, 2014

Poached Chicken With Tangy Ginger Fermented Bean Paste Dip


This is another easy and no fuss chicken dish.  I poached half a chicken and prepared a simple and easy dip for the poached chicken.  And the water used to poach the chicken will be used as soup base. All I did was  cut up some carrots and tomato and add to the soup base.  Add in sea salt and the soup is ready for serving :)   

Colleagues asked me why I bother to cook when it is just for the two of us .  Eating out would be a better solution . But for people who loves cooking , they wouldn't mind putting in a bit of work ...right ?  LOL! and I am one of those who loves cooking.  No matter how lazy I am or how simple the dish is, simple homecooked food is still my number one choice :) 


Poached Chicken With Tangy Ginger Fermented Bean Paste Dip


1 free range chicken - cleaned and towel dry
water enough to cover the chicken

1 tsp of sesame oil

Boil water in a deep pot on high heat to a rolling boil. Put in the chicken and cook the chicken under medium heat for 20 mins.  Take out the chicken and dip the whole chicken into ice cold water for 5-8 mins. Meanwhile , reheat the water till boiling hot . Put in the chicken again and turn off the heat. Leave the chicken in the pot for another 20 mins.  Take out the chicken and rub sesame oil on the surface of the chicken and leave the chicken to cool down before cutting into serving size. Serve the cut chicken with ginger and spring onion dip.


Tangy Ginger Fermented Bean Paste Dip

3 tbsp of fermented bean ( tau cheong paste )- chop fine
1 thumb size ginger - julienne
2 green bird's eye chilli - sliced
1 calamansi juice

Mix the above ingredients together in a sauce bowl and serve chill or room temperature


Enjoy !


*              *            *


Wednesday, March 19, 2014

Crisp Oven Baked Nando Kaffir Chicken


I love fried chicken but when I think of the oil involved , I shun deep frying the chicken.   I learned from other food bloggers that you can have crisp chicken without deep frying them in litres of oil.  You can have crisp Nando Kaffir chicken without deep frying them. I first learned from Angie Tee of  Seasaltwithfood  that you can get still crispy chicken without deep frying them.  I oven baked chicken again for our dinner but this time with a different flavor and gosh it was finger licking good and addictive too.  I wanted to eat just a piece but I ended up eating four pieces.  Gosh , I am really a glutton when it comes to good food :p


marinate the chicken pieces with Nando Peri  Sauce, kaffir leaves, 
sea salt and leave it in fridge for 3-4 hours or overnight
for better taste and flavor

coat with the flour mixture and let it sit on the rack until the chicken meat
dries out before baking  in the oven 


Crisp Oven Baked Nando Kaffir Chicken 

Ingredients

12 Chicken Wings, tips removed
Lime Wedges
½ Cup All-Purpose Flour  * I added 3 tbsp of potato flakes to the flour
1 tsp Baking Powder
¼ tsp Baking Soda

Peanut Oil


Marinade


3 tbsp of  Nando hot peri sauce
5 kaffir leaves/lime leaves - cut into fine shreds
1 tsp of sea salt
1 Tbsp Peanut Oil
Method


In a medium bowl, whisk Nando peri sauce,  lime leaves, sea salt,  Marinate the chicken pieces for about 4 hours, or overnight.


Whisk together the flour, baking powder, and baking soda. Line a large baking pan with tin foil. Place a wire rack on top of the prepared pan. Coat the chicken pieces with the flour mixture, making sure that all the nooks and crannies are covered, and shake off any excess flour. Arrange coated chicken pieces in a single layer. Allow the chicken  pieces to dry out on the kitchen counter for an hour before baking.

Preheat the oven to 450˚F. Drizzle a little oil on top of the chicken pieces and bake for about 20 to 25 minutes on each side. Serve warm .


Enjoy !


Tuesday, March 18, 2014

Oyster Mushroom And Prawn Kimchi Jijgae


I love kimchi jijgae...for it is comfort food for me :)  Easy to prepare and it is appetizing...slurp! Whenever I made kimchi , I make sure I make a big load of it and have extra tubs enough for making kimchi jijgae through out the year. Kimchi appears very often on the dining table as a side dish.   WB doesn't like the smell of kimchi  :(  but I love my homemade one ...LOL!  I normally add fresh mushrooms and prawns to the kimchi jijgae.  I have the whole claypot of kimchi jijgae all to myself.  Believe it...I can be a glutton and WB finds it amazing how I could tuck in the whole claypot of kimchi stew at one go.  Nay, the claypot is for a single person so it is not really that big a portion :p  You can serve rice or noodle with this kimchi jijgae.


Oyster Mushroom And Prawn Kimchi Jijgae 

ingredients:

(A)
1 cup of chicken broth
1 cup of homemade kimchi
1 tbsp of gochujang paste
1 tsp of chilli flakes

(B)
1 pkt of fresh oyster mushrooms - cleaned
8 pieces of sea prawns - shelled, cleaned and deveined
spring onions  - cut into 1 inch length

 Method:

Combine (A) in a claypot and simmer under medium heat.  When it comes to a rolling boil, add in prawns and oyster mushrooms.  Cook till the oyster mushrooms has soften and the prawns is cooked. Add in a pinch of salt for taste . Off heat and garnish with spring onions.  Serve hot with noodles or rice.


Enjoy !


*              *              *


Monday, March 17, 2014

Swiss Button Mushroom And Salmon Pasta


When I am in pasta eating mood, this is what I will prepare for myself and WB.  He is not really a fan of pasta but he is beginning to like pasta the way I cooked them.  All I did was to saute the brown button mushroom slices with garlic and olive oil till fragrant...add in the cooked pasta and stir fry till well combined, add in some freshly ground black pepper , sea salt,  mixed dry herbs and a dash red cooking wine.Lastly add in the pan seared salmon flakes before serving.   Mmmmm, I don't know about you but to me, this is one oh so delicious pasta.  Each mouthful is bursting with woody and sea scent flavor.....it looks like it invlove a lot of work but in actual fact it is easy.  While one stove is cooking the pasta till al dente, the other stove is searing the salmon.  While both are cooking on the stoves,  I sliced the garlic and the fresh mushroom and when the pasta is ready, the salmon is ready too and the garlic and mushrooms are done then.  I am good at multi tasking when it comes to working in the kitchen and the office :p   Thus cooking this is a easy as ABC.  I am thankful that I am on the road to recovery and soon I will be cooking more elaborate dishes :)  


Enjoy !


*                   *                   *

Sunday, March 16, 2014

Sitiawan Red Rice Wine Chicken Leg With Bai Ling Mushrooms


I have a bottle of red rice wine from Sitiawan and it has been sitting the fridge for a good 6 months. I remember I bought it a month before I went for my operation. Time to cook them with the chicken legs and I know how I am going to cook the chicken legs.  I opened a can of Bai Ling Mushrooms aka known as ' mock abalone ' , sliced them into thin slices. These mock abalone has a springy texture. You can guess how delicious and tasty this dish is. I remember my grandma used to cook this dish for me during my confinement and tonight , I cooked the same way she prepared it, except I added  these Bai Ling Mushroom slices to the dish.  WB loves this dish too :)


Bai Ling Mushroom
there are two pieces in one tin


Sitiawan Red Rice Wine Chicken Leg With Bai Ling Mushrooms

Ingredients :-

2 chicken legs- cut each chicken leg into four pieces
a few pieces of ear wood fungus - soaked , cleaned and cut into fine stripes
a few slices of ginger,
1/2 tbsp of sesame oil
1 pip of garlic
1/2  cup of red rice wine
3/4 cup water
a pinch of sea salt
a can of  bai ling mushroom - cut into 1/8 inch thick slices

Method:

Heat up sesame oil in a wok , when it is smoking hot, add in slices of ginger and garlic and wood fungus strips and saute all the ingredients till fragrant.  Add in the chicken leg pieces and bai ling mushrooms and continue stir frying till 3/4 cooked.  Pour in water and red rice wine and simmer till the chicken pieces are  cook through. Add in salt to taste.  Dish up and serve hot .


*          *           *


Friday, March 14, 2014

Pan Seared Yellow Fin Sole Fillet With Butter


I know it is not healthy to pan sear fish with butter but somehow fish fillet taste better when pan seared with butter :p  It is something I do indulge in once in a while. Fish and butter goes well :p  Like I always say, everything in moderation.  I saw some frozen yellow fin sole fillet in Jusco and I bought a packet back for WB.  He doesnt like fish because of the bone but if fillet, he doesnt mind.  So to encourage him to eat more fish , I bought these frozen ones back and panseared  them in butter for him.  Simple and yet aromatic with black pepper and sea salt as seasoning.  I added a dash of balsamic vinegar to the fish to give it a sizzle and gosh it tasted delicious. Surprisingly, WB likes the buttery taste of the fish and of course, the balsamic vinegar gave it the special slight tangy flavor...mmmmm the taste was awesome.  Imagine the taste in your mind, buttery, peppery, sea scent and the slight tangy after taste from the balsamic vinegar...mmm I don't need to write on...this is the perfect way to cook these fillet.  


                           the fillets were surprisingly  fresh


texture - succulent and moist
taste - buttery smooth and sea scented
peppery and tangy aftertaste...
love the way this was  prepared  Yummy!

Thursday, March 13, 2014

Wagyu Steak


This is my first time tasting wagyu beef :p  sounds like a greenhorn !  Thanks to Lynn for gifting four pieces of wagyu beef to us .  She said these are for your blog LOL!  Lucky Elinluv's Tidbits Corner !  :)

Sorry for only posting it today Lynn.  My piggies were blessed too, they too had their first bite into these succulent and almost melts in the mouth wagyu beef. Now I know why they are so expensive :)  Lynn taught me how to prepare them . Just sea salt when it is ready and only 3 mins on each side .   I added  a dash of black pepper to it though :p  My Piggies and I love our beef medium rare but WB loved his cooked.  Because of his IBS ( Irritable Bowel Syndrome ) he is quite picky on his food of late :(   

this is how succulent and juicy the wagyu beef looks mmmmm


this is heavenly and  Lynn , I want to thank you  for these wagyu beef
I am no longer a greenhorn ! Yea, no longer a greenhorn LOL!

Wednesday, March 12, 2014

Smoked Chicken


Have you ever experience brain freeze when you can stared at the chicken and do not know what or how to prepare it? I do, I will be staring at it and the mind goes blank.  But when your mind has thawed :p you would think should I roast it, deep fried with Kentucky flour or stir fry with ginger and spring onions or cook a stew with it or curry ?  Then I took out my iPod and start to googled what to do with the chicken in hand. Many chicken recipes will pop up on your screen....still don't know what to do with it . Sat down and watch a cooking show and tada....it was showing how to do smoked duck......LOL! inspiration just comes in and yea ...smoked chicken....simple and it turned out yummilicious....I shot up from the sofa and ran to the kitchen. Marinated the chicken with Chinese five spice powder and sea salt for 30 minutes ( better if half a day at least )  I added a bit of ground black pepper and pan seared the chicken on both sides till 3/4 cooked.  Then smoked it for another 20 minutes in a wok.....Wow ....it tasted so good that this simple recipe had me eating it with my hand and licking my fingers clean :)   Inspiration came just watching the idiot box...should be seated more often in front of the box so that I can think out of the box :p


finger licking good piece of smoked meat :) 


cleaver has to be sharp to give a clean cut :)


Smoked Chicken 


Half a chicken -wash , drain and leave skin on

1/2 tbsp of chinese five spice powder
1 tsp of sea salt

1 tsp of ground black pepper

for smoking the chicken :-
chinese wok
a piece of aluminium foil as base
tea leaves - I used Lipton tea leaves
sugar
steaming rack with holes  * see picture above

Method:

Lined the wok with a piece of aluminium foil big enough to take the drips during the smoking process. Spread out the tea leaves and sugar evenly over the foil.  Sit the steaming rack over the leaves and sugar and heat up the wok until you see smoke under medium high heat.  Place the chicken , which has been pan seared till 3/4 cooked, on the rack and cover the wok with the lid.  Smoked the chicken for 20 minutes.  Off heat and cool the chicken before cutting into desired pieces with a sharp cleaver. Serve with rice.


Enjoy !


Tuesday, March 11, 2014

Ojingeo Bokkeum - Korean Spicy Stir Fry Squid


This is one of the most popular spicy  dishes in Korean cuisine.  I replaced squid with cuttlefish...my favorite seafood which I can indulge in once in a while.  I took full advantage of the chance when I saw some nice ones being sold at Tesco.  I saw this dish when I googled for nice korean dishes and straight away fell in love with it the moment I set my eyes on the photo that comes with the recipe.  It looks delicious and I knew I had to try it out or I won't be able to sleep a wink :)  I replaced not only the squid but also the zucchini with water convolvulus ( water spinach ) or local name ' kangkung ' .  The main sauce ingredients are gochujang ( fermented chili pepper paste ) and gochugaru ( chili pepper flakes ) and for an authentic dish, there simply is no substitute for them.  This recipe is hot but not fiery hot.  The red chilli sauce adds a burst of spicy flavor to the crisps carrots and tender cuttlefish.  I can eat  two bowls of rice with just this dish :)  If you love korean cuisine, you must not miss this out, definitely not ! I will cook this again for sure !


Ojingeo Bokkeum - taken from Korean Bapsang

Ingredients :

1 medium size squid ( abut 400 grms) * I  replace with cuttlefish ( blanch in boiling water and drain dry)
1/2 medium carrot
1/2 medium onion * I omit this
1/2 medium zucchini * I replace with water convolvulus/kangkung  ( blanch in boiling water and drain dry)
1 green or red chili pepper
2 scallions
1 tbsp of vegetable oil
1 tbsp of sesame oil

Sauce:
2 tbsp korean chili pepper sauce ( gochujang)
1 tbsp korean chili pepper flakes ( gochugaru )
1 tablespoon soy sauce
1 tablespoon sugar
1 tablespoon minced garlic
1 teaspoon minced ginger
1 teaspoon sesame seeds
pinch black pepper

Combine all of the sauce ingredients in a small bowl.

Clean the squid (see below). Slit the body open and flatten. Lightly score the inside in a small diamond pattern (about 1/4-inch squares). (You can skip the scoring, but it helps the squid pieces hold more sauce and gives them an interesting look.) Cut into about 1-inch wide and 2-inch long bite size pieces. (Do not make the pieces too small as they will shrink when cooked.) Cut the tentacles into the same lengths. Mix the squid with the sauce and marinate while preparing vegetables.

Thinly slice the onion. Juliene carrots into fine matchsticks . Cut the chili peppers diagonally into 1/2-inch thick strips. Cut the scallions 2-inches long.

Heat a large skillet over high heat and add the vegetable oil. Add the carrots, followed by the onions, zucchini ( water convolvulus ) , peppers and then the scallions. Stir fry the vegetables quickly only until they start to wilt, about 2 minutes. Push the vegetables to the sides of the skillet. Add the marinated squid ( cuttlefish) and any remaining sauce to the center of the skillet. Stir fry just until the squid pieces curl up and turn opaque (about 2 minutes). Stir to mix the vegetables and the squid( cuttlefish) well for a minute. Drizzle the sesame oil over. (Do NOT overcook, or the dish will be watery and the squid (cuttlefish) tough.)  

Serve hot with rice.


Enjoy !

Wednesday, March 5, 2014

Baked Pumpkin Rice


I managed to get a small pumpkin just enough for two person. I have a craving for chinese sausages and chestnuts of late and a sudden crave for this baked pumpkin rice.  So , knowing me, I put all the ingredients I love together and baked them in this cute little pumpkin :)  I lightly fried the chinese sausages so that all the fat from the chinese sausages will melt and this will make the rice less oily.  I asked WB to help diced the sausages, chestnuts and chinese mushroom...I am so lucky now I have an assistant to help me prepare this dish. Now I am very good at giving instructions and hope my assistant will continue to render his services to me at all times :p   This dish is easy to prepare once the dicing and cutting is done.  I mixed the cooked rice with the fried sausages, diced mushrooms, chestnuts and diced pumpkins and added sea salt and black pepper as seasoning.  Packed the rice mixture into the cleaned pumpkin. ( cut the top and scooped out the seeds and threads from the pumpkin ) Close the pumpkin with the top and wrapped the pumpkin with aluminium foil and bake at 200 degC for  35-40 mins.  Serve rice together with the pumpkin wedges.  Oh -so- yummy !


the rice is packed with flavors...the aroma from the sausages and mushrooms
infused into the rice while baking in wrapped foil....yummy!


If you have guests, this would be ideal to serve them
easy to prepare and yet delicious at the same time


Baked Pumpkin Rice

ingredients :

1 pumpkin - size depends on individual and how many persons you are serving 
cooked rice - amount depends on how many persons your are serving
chinese sausages - fried and diced
ready packed chestnuts - diced
a slice of pumpkin - diced
chinese mushrooms- soaked till soften - diced

sea salt to taste
black pepper to taste

Method:
Preheat oven - 200C

Cut off the top and scooped out the seeds and threads from the pumpkin. Wash and drain off water from the inside of the pumpkin.  Combined the cooked rice with the diced ingredients and season with sea salt and black pepper.  Fill and packed the pumpkin with the rice mixture. Cover with the top and wrapped the pumpkin with aluminium foil.  Baked the pumpkin for 35-40 mins.  Take out and cut the baked pumpkin into served and  served the rice together with the pumpkin wedges.


Enjoy !


Related Posts Plugin for WordPress, Blogger...