Tuesday, June 21, 2016

Mung bean sprout side dish (Sukjunamul-muchim: 숙주나물무침)


I homesprouted a bucket of mung beans sprouts after watching Maangchi on youtube.  I am very much inspired by this korean lady :) she can be cute at times and I love her korean dishes that she presented on youtube.  Oh, in case you are a first time here, I love Korean cuisine and love their banchan /side dishes very much. They are  light and easy and healthy too. 

With a bucket full of mung bean sprouts, I took some to make mung bean sprouts omelette some weeks back ( click here for the recipe ) and today I made sukjunamul-muchim with the remaining sprouts.  A light and easy and flavorful side dish.  This is so tasty that I have added them to meal menu :)  

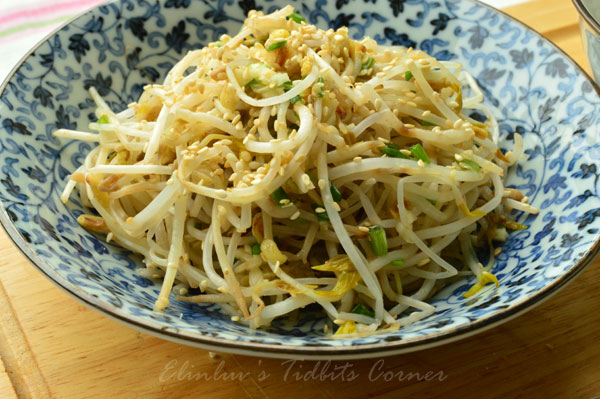
a plate of deliciousness

crushed toasted sesame seeds and spring onions
 adds crunch and flavor to the natural sweetness of the sprouts

my homesprouted mung beans sprouts are tall and thin BUT
they have a crunchy texture when I gave it a quick blanch with hot boiling water

I can have the side dish all to myself
this plate has healthy vegetable protein :)


Mung bean sprout side dish (Sukjunamul-muchim) - adapted from Maangchi

Ingredients:
1 pound mung bean sprouts (or grow your own mung bean sprouts)
2 cloves garlic, minced
2 teaspoon fish sauce
½ teaspoon salt
2 green onions, chopped
1 tablespoon sesame oil
2 teaspoons sesame seeds - toasted

Directions

  1. Bring a large pot of water to a boil.
  2. Blanch the sprouts for 1 minute, stirring with a wooden spoon. Strain them and rinse in cold water in a large bowl for a couple of times. As you rinse them, shake them under the water so the skins fall into the bowl. Put the cleaned sprouts in a basket and strain well. 
  3. Combine garlic, green onion, fish sauce, salt, sesame oil, and sesame seeds in a bowl. Add the sprouts and mix by hand to season evenly.
  4. Transfer them to a serving bowl or plate. Serve warm or cold as a side dish. You can refrigerate them for up to 3 days. 

Vegetarian version

Skip fish sauce and use 1½ teaspoon salt.

Enjoy!

Monday, June 20, 2016

Fried Rice Vermicelli Vegetarian Style


This is the vegetarian fried rice vermicelli that I cooked to bring along with the Ayam Goreng Berempah to the cg meeting, which I had shared earlier in my previous post.  I am not good at handling fried mee or rice vermicelli for that matters but I am glad that I managed to pull it through. I added wood ear fungus, chinese mushrooms, cabbage, carrots and not to forget , fried beancurd skin to the rice vermicelli.  The fried noodles tasted delicious and flavors-packed even though it was fried vegetarian style. 

I pounded some sambal belacan as an accompaniment for the fried noodles. The sambal belacan was lipsmackingly good. I am glad that my cg loved this dish besides the crispy flavorful Ayam Goreng Berempah.  I always have this joyful feeling whenever I see people enjoying my homecook food. I love to cook for poeple who appreciate my cooking :) This is a keeper and I will definitely cook this again for my next potluck gathering since I can handle the frying of rice noodles :)  

to make things easier , I gave all the cut ingredients a quick stir fry 
and add seasoning to taste before adding to the fried noodles


and deep fried the beancurd skin to be added later to the 
fried noodles


crispy shallots and spring onions for garnishing

these are two dishes plus  a red bean sweet soup I cooked for last Friday cg meeting
Yay! I managed to cook these in just one afternoon


Fried Rice Noodles Vegetarian Style

Ingredients:

1 pkt of rice noodles  ( beehoon ) soaked in water for 10 -15mins, drain off water and keep aside

(A)
1 pkt of dried beancurd skin - deep fried till lightly golden, drain off excess oil
1 carrot - grate into long thin shreds
1/4 cabbage - cut into shreds
a few pieces of wood ear fungus - soak till soften, cut into shreds
6 pieces of chinese mushrooms - soak till soften cut into shreds
2 tbsp of grapeseed oil 
2 shallots -sliced
1 cloves of garlic - sliced

seasoning mixture

2 tbsp of oyster sauce
a dash of ground white pepper
a tsp of dark soy sauce
1 tbsp of light sauce
3/4 cup of water
a drop of sesame oil

Garnishing

6 shallots - slice thinly - fried in oil till crispy and golden brown
3 cloves of garlic - slice thinly - fried in oil till crispy and golden brown
spring onion - sliced

Sambal Belacan - 
10 fresh red chillies - you can add bird's eye chilli if you want more heat
 1" square X 1/4 " thick belacan

Method to make sambal belacan

Coarsely pound  10 fresh chillies in a mortar and pestle , while the  belacan is being toasted on the hot griddle.  Once the belacan is well toasted and fragrant , add to the pounded chilli and continue to pound till the toasted belacan is evenly combined into chilli.   Take out and serve with the fried noodles.

Preparation:

Heat 2 tbsp of grapeseed oil in wok, saute sliced garlic and shallots till fragrant, add in ingredients (A) and stir fried till cooked and cabbage has soften. Dish up and keep aside.

Using the same wok, heat up 2 tbsp of oil , once oil is hot, add in the rice noodles and stir fry for 5 mins.  Add in the seasoning mixture and continue to stir fry the noodles till rice noodle is cooked. Taste the rice noodle, if it is bland, add in salt to taste. Once the noodles has soften, add in the stir fried ingredients (A) and some crispy shallots and garlic and  mix till well combine. Dish up and sprinkle garnishings on the fried noodles. Serve  with sambal belacan.


Enjoy !


Friday, June 10, 2016

Mung Bean Sprouts Omelette

Have you ever tried sprouting  your own mung beans?  I did and am pleased that I got a bucket full when I harvested them this morning.  There are many methods to sprout the mung beans and I used the method shared by Maangchi Korean Cooking on youtube.  The only thing to mention was the mung beans that I sprouted were tall and not meaty like the one sold in the market. Anyway, I am still pleased since it is my first time sprouting the mung beans.   I took cleaned some to cook omelette and the rest I kept in air tight container in the fridge. It can keep well if it is dry to touch.

Back to the omelette, the sprouts really taste good, has a crunchy texture even after adding them to the omelette.  I am happy about home sprouting and home cooked meals.  A simple dish like this is good enough for the two of us.  You can try out this mung bean sprouts omelette with the store bought mung bean sprouts ( taugeh as it is locally known )  Easy and can whip this omelette in less than 10 mins :)

my home sprout mung beans :)
a bucket full...long and lean hehehe
it still gives me joy to see them sprouts

simple to prepare and taste good

accompaniment for the mung bean sprouts omelette is
my signature sambal belacan :p

Mung Bean Sprouts Omelette

a handful of  mung bean sprouts (taugeh ) remove tails ,wash and drain dry
1 stalk of spring onion - sliced
1/2 carrot - coarsely grated
2 red chilli - sliced

2 eggs - whisk together with the seasoning below
1 tsp of Maggi Seasoning
a dash of ground white pepper
a pinch of salt

1 tsp of grapeseed oil

Method:

Grease a non-stick pan with a tsp of grapeseed oil and heat pan over medium low heat. Once pan is hot, add in the beaten eggs with the seasonings and sprinkle the grated carrots and spring onions and chilli. Once the base is slightly set, and the top is still wet ,add in the mung bean sprouts, spreading evenly all over the surface. Once the base is totally set and has turned golden brown, flip the omelette over  and cooked for a few seconds just enough time for the mung beans sprouts to be cooked and not overly cooked.  Flip over and serve with the mung bean sprouts side up .  This omelette taste good with homemade sambal belacan.


Enjoy !


Monday, June 6, 2016

Ayam Goreng Berempah Revisited( Malay Style Fried Spiced Chicken )

Last Friday was my turn to bring food for cg meeting.  Knowing me, I rather cook then to buy ready cooked food from the shop.  I planned my menu few days before Friday came and I was glad that every dish turned out well.  I have Fried Rice Noodles Vegetarian Style and Ayam Goreng Berempah ( Malay Fried Spiced Chicken )  and  Pressured Cooked Red Beans Sweet Soup on my list.  I prepared the cuttings and marinating a day before thus making it possible for me to handle the cooking on the Friday afternoon itself. Will share the Fried Rice Noodles Vegetarian Style in my next post.

This Malay style Fried Spiced Chicken is a keeper and will cook this again in future potlucks.  So very Malaysian and all the herbs and spices are easily available in the supermart.  I bought drumsticks instead of whole chicken so that the cooking time will be easier to handle....and anyway drumstick meat is more tender and smooth.

All the Cell Group members loved this fried chicken.  The fried spiced crumbs add crispness to the drumsticks . I give this fried chicken a 10/10  :) Try the recipe to believe me.  I took the recipe from Sonia . Thank you Sonia for the recipe.  We all love it !


I added fresh turmeric for the fresh look and aroma


the curry leaves are from my little space..it is good to have
these herbs planted in your garden

after deep frying it, drain off excess oil on kitchen paper towel


do you notice the mat base I made from pandan leaves from my garden
the hot fried drumsticks sitting on the pandan mat
gives out a mild fragrant :) 


Ayam Goreng Berempah ( Malay Freid Spied Chicken ) taken from Nasi Lemak Lover

15 pieces of drumsticks - wash, drain dry

1 tsp serbuk jintan putih ( cummin powder )
1 tsp serbuk jintan manis (fennel powder )
1 tsp serbuk ketumbar ( coriander powder
1 tsp chilli powder
1/2 tsp turmeric powder * I used fresh turmeric instead
1 tbsp curry powder ( meat type )
1 tbsp cornflour * I used potato flour + cornflour
1.5 tsp salt

Blend into a paste
4 garlic cloves
6 shallots
1/2 inch galanggal (blue ginger)
1/2 inch ginger
4 stalks of lemongrass
3 tbsp water

Method:
1.  Marinate chicken pieces with all ingredients for several hours or overnight in the fridge

2.  Heat oil in wok ( sufficient to deep fry the chicken drumsticks at one go) over medium to low heat, put marinated chicken drumsticks into hot oil pieces by pieces. Deep fry till golden brown and cooked (15 mins )

3. Once done remove the chicken pieces and fried spiced crumbs using a strainer and keep aside to drain off excess oil.

4.  Serve hot.


Enjoy!


Wednesday, June 1, 2016

Homegrown Mint And Taiwan 'Yau Mak' - Healthy Meal


I am happy with my harvest from my little space...Mint and Taiwan 'Yau Mak' .  I turned them into healthy dishes...simple to prepare and lots of nutrients :) and knowing what you feed the veggies makes it even more healthier :p  First dish is Mint Omelette With Toasted Laver (seaweed) and the second dish is Stir fry Taiwan ' Yau Mak' with tau joo aka fu yee ( white version ).  These two dishes is enough for two persons.  A light meal though. You can serve these dishes with teochew porridge or with plain rice. 

I do eat -out often or order in if I am too lazy or tired.  And when I cook, I try to cook healthy and homecooked is still the best.

the mint grown in my little space are luscious

these homegrown Taiwan 'Yau Mak' are sweet and crunchy

toasted laver (seaweed)

mint omelette with toasted laver...
so good

a simple and light dinner after a heavy lunch  :)

I love this stir fry style for the Taiwan 'yau mak' especially
with garlic, chilli and fu yee


Mint Omelette With Toasted Laver 

a bunch of mint leaves - wash clean and drain dry
a clove of garlic - chopped
1 or 2 bird's eye chilli - sliced
2 eggs - beat up - season with a pinch of salt & pepper
1 tbsp of grapeseed oil for frying the omelette

a small packet of toasted laver(seaweed)

Method:
Heat up non-stick pan with a tbsp of grapeseed oil, saute the garlic, chilli till fragrant. Add in the mint leaves and as soon as the leaves wilted, add in the beaten eggs and cook till the eggs has set. Flip over when the bottom is lightly brown. Add the toasted laver pieces by pieces 0nto the surface of the omelette.  Once the bottom side is brown. Dish up and served hot with either plain rice or teochew porridge.


Stir Fry Taiwan ' Yau Mak ' With Fu Yee or Tau Joo

a bunch of Taiwan ' Yau Mak ' - soaked, cleaned and drained and cut 1" length (stem and leaves)
3 cloves of garlic  -  chopped
2 bird's eye chillies - sliced
1/2 piece of fu yee /tau joo (white version)
1 tbsp of grapeseed oil
1/4 cup of water
* pinch of salt to taste - I omit salt as fu yee is quite salty

Method:
Heat up wok with 1 tbsp of grapeseed oil, add in chopped garlic , chillies and fu yee and saute till fragrant. Add in the cut Taiwan ' Yau Mak' and stir fry till it starts to wilt or soft, add 1/4 water or less and continue to stir fry till the veggie is cook.  Dish up and serve with porridge or rice.


Have a great day !


Related Posts Plugin for WordPress, Blogger...